Capturing the Perfect Coastal Light for Your Photography

The sun sits low over the Atlantic, casting a long, amber glow across the salt-weathered siding of the colorful houses in the Old Town. A thick fog rolls in from the harbor, softening the edges of the Bluenose II and turning the jagged coastline into a series of ghostly silhouettes. Capturing this specific light—the way it interacts with the mist and the granite shore—is what separates a snapshot from a photograph that actually tells a story. This post breaks down how to work with the unique, often unpredictable light of the South Shore to get better shots of our local scenery.
Living in Lunenburg means dealing with a lot of changing light. One minute you have harsh, high-noon sun reflecting off the harbor water, and the next, you're staring at a wall of grey fog that makes everything look flat. It's a challenge, but it's also why our corner of Nova Scotia looks so good in photos.
What is the Best Time for Coastal Photography?
The best time for coastal photography in Atlantic Canada is during the "Golden Hour"—the hour after sunrise and the hour before sunset—when the light is soft, warm, and directional. During these times, the shadows are long and the colors are much more saturated.
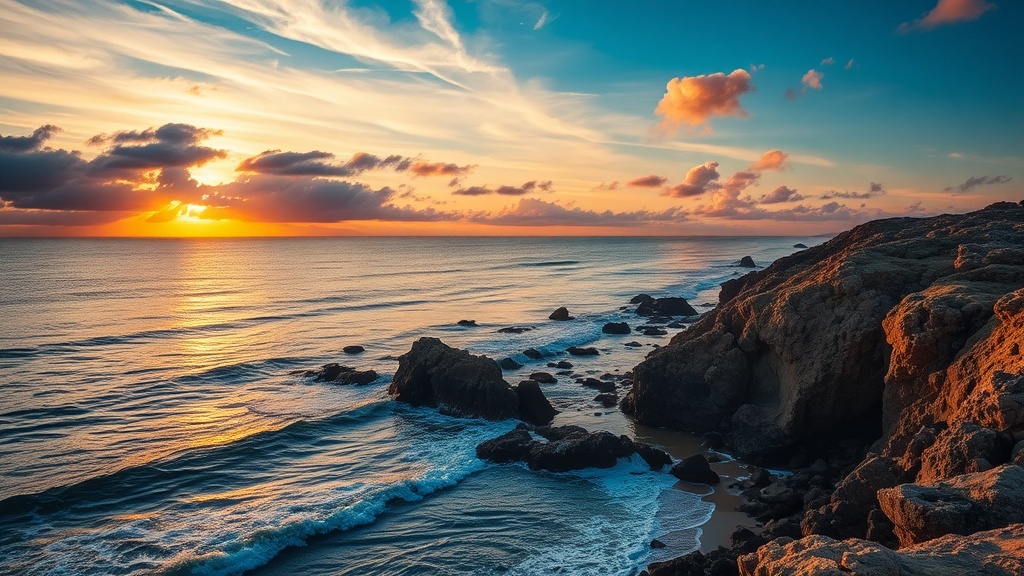
If you're out near the Lunenburg National Historic Site, the light changes fast. Early morning is often better for catching that crisp, clean light before the Atlantic fog becomes too thick. If you wait too long, the sun climbs too high, and you lose the texture of the waves. You'll end up with a lot of glare on the water, which is a pain to fix in editing.
Mid-day light is tough. It's harsh and tends to wash out the colors of the bright red and yellow houses. If you have to shoot during this time, look for shadows. A porch or a narrow alleyway can provide a bit of relief from the direct glare.
Pro Tip: Keep an eye on the tide charts. The way the light hits the shoreline changes drastically depending on whether the tide is coming in or going out. A low tide reveals more of the rocky texture, which looks incredible when the sun is low.
How Can You Handle Fog and Mist?
To handle fog and mist, you should underexpose your shot slightly to prevent the sky from looking like a blown-out white void. Fog acts as a massive natural softbox, which is great for portraits but can make your landscapes look a bit "flat" if you aren't careful.
When the fog rolls in—and let's be honest, it does a lot in Lunenburg—it can actually be your best friend. It adds a sense of depth and mystery. Instead of fighting it, lean into it. Use a polarizing filter to manage reflections, or try to find a subject that pops against the white background, like a brightly colored fishing boat or a dark wooden pier.
That being said, fog can also be a nightmare for your gear. The moisture in the air is real. If you're out with a high-end camera like a Sony Alpha or a Canon EOS, you'll want to be mindful of condensation. Don't move from a warm car directly into the salty, damp air without letting your gear acclimate first. It prevents that annoying fogging on your lens.
Here is a quick breakdown of how different light conditions affect your gear and settings:
| Weather Condition | Visual Effect | Recommended Setting |
|---|---|---|
| Clear Sky | High Contrast/Harsh Shadows | Lower your ISO and use a fast shutter speed |
| Overcast/Grey | Low Contrast/Soft Light | Increase your exposure slightly to avoid "muddy" looks |
| Fog/Mist | Low Detail/High Diffusion | Underexpose slightly to maintain depth |
| Golden Hour | Warm/Directional Light | Use a tripod to allow for slower shutter speeds |
What Equipment Do You Need for Coastal Light?
You don't need a bag full of expensive gear to take a great photo, but certain tools make a massive difference when the weather turns. A sturdy tripod is the single most important item if you want to shoot during the golden hour or in low-light conditions.
When the light is fading, your camera needs more time to "see." If you're handheld, your photos will likely be blurry. A tripod allows you to use slower shutter speeds to capture the movement of the Atlantic waves without the shake. If you're out walking the waterfront, a lightweight carbon fiber tripod from a brand like Manfrotto is a good investment.
You might also want to consider these specific items:
- Circular Polarizer: This helps cut the glare off the water and makes the blue of the sky pop.
- Neutral Density (ND) Filter: If you want that silky, smooth water look during the day, an ND filter is a must.
- Microfiber Cloth: You'll be cleaning salt spray and mist off your lens constantly.
- Lens Hood: It helps prevent stray light from hitting your lens and causing flares.
I remember once trying to shoot the harbor during a particularly bright afternoon without a polarizer. The reflection off the water was so intense I couldn't even see the details of the docks. It was a total waste of a trip. Now, I never leave the house without my filter kit.
How Do You Manage Reflections on the Water?
Managing reflections requires a combination of camera angles and the use of a polarizing filter. If you want to see through the surface of the water to the rocks below, you need to tilt your lens or use a polarizer to cut through the light hitting the top layer.
If you're shooting near the docks, the water is often choppy. This creates a lot of "noise" in your photo. To get those clean, glassy reflections of the Lunenburg waterfront, you'll need to shoot at a very low angle and use a long exposure. This is why the tripod I mentioned earlier is so vital. You can't get a 2-second exposure steady with just your hands.
The catch? Long exposures mean you have to be patient. You can't just snap and go. You have to set up, find your angle, and wait for the light to hit just right. It’s a process, but the results are usually worth the wait. It's a lot like savoring a slow meal—you can't rush the best parts.
Sometimes, the best shots happen when you stop trying to control everything. If a sudden wave hits your tripod, or the wind blows your hat off, don't sweat it. The most interesting photos often come from the moments where the environment takes over. The Atlantic isn't something you can "tame" with a camera; you just have to learn to dance with it.
Whether you're a seasoned pro or just someone with a smartphone, the light here is unlike anywhere else. It's moody, it's temperamental, and it's beautiful. Just keep your eyes peeled and your lens clean.
Steps
- 1
Find Your Golden Hour
- 2
Use the Harbor Reflections
- 3
Embrace the Foggy Atmosphere